Jump to content


Photo

Mario Kart 64 - not working (pic heavy)


  • Please log in to reply
16 replies to this topic

#1 Camster

Camster

    Newbie

  • New Members
  • 8 posts

Posted 21 February 2015 - 01:20 AM

Hi all,


I’m new to the site but did say Hi in the introduction thread.  I’m Cammy and I’ve just purchased my first fruit machine – Mario Kart 64.  I’ve never really played fruit machines but have always loved playing arcade and console games.  The reason I bought this machine is because I’m a massive Nintendo fan and would love to get this working to go alongside all my other Nintendo stuff, if I ever get the gaming room finished.


Ended up driving close to 800 miles round trip to pick this up so in the end probably spent silly money buying a non-working machine, but I wanted this for it’s “Nintendo’ness” so had no other option really.  I didn’t even know that there were Mario-related machines until just recently and when I found this non-working one for sale I did some reading on repairs and that is what brought me here.


Pictures below should tell the story.  I reckon it may just need a new main board and all should be well but if you have other suggestions or any advice them I’m all for listening.  Would be pretty awesome to do a full on restoration of this if does become fully working and would also like some Nintendo arcades to go along side it, but that is a long, long way off and I would need a bigger room!


I’ve got a bunch of tools and have done a fair bit of building/crafting/repairing/wiring work before but have absolutely no experience with fruit machines, but should be fine with the simpler replace items rather than the repair side of things, like trying to fix a PCB.


The person I bought it from told me that the person he bought it from (still with me here?!?) said that when powered up the alarm would come on and the machine would just buzz but then after he got it home and opened it up it turned out there wasn’t a PSU inside, so he bought a “new” one but the machine still wouldn’t work.  That’s how it then ended up back up for sale and in my hands.


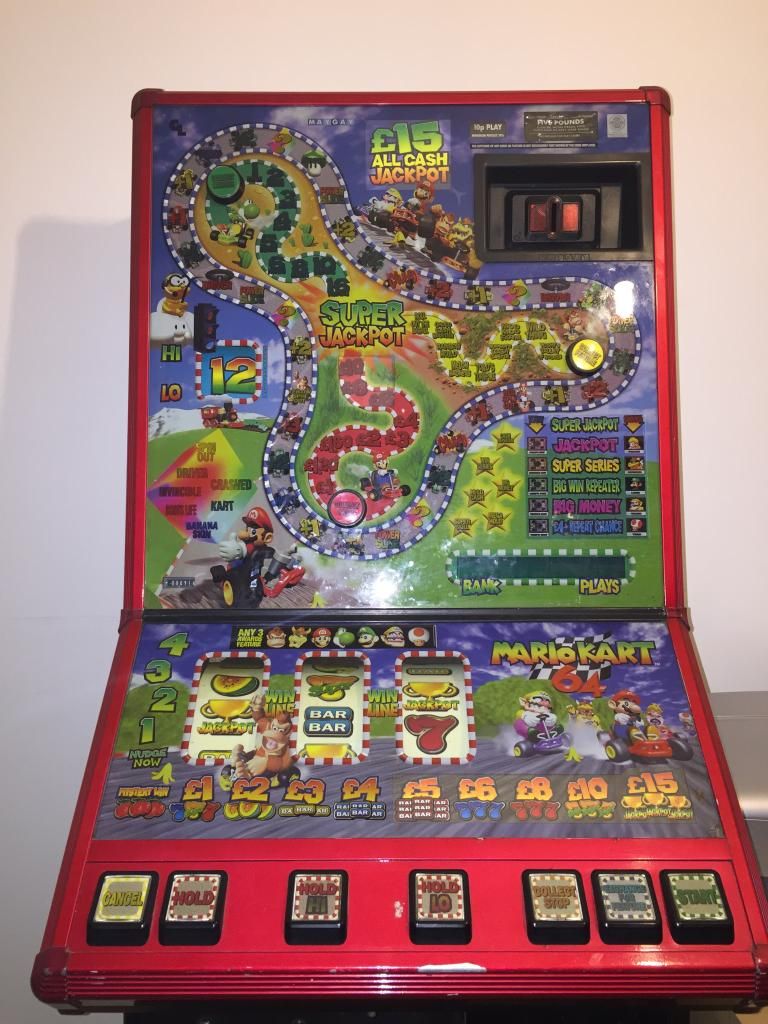
So, this is how it was once I got home.  I reckon it’s in pretty decent nick:

IMG_2498.jpg


Inside the bottom cabinet bit:

IMG_2490.jpg


Close up of the PSU – clearly not a “new” one so I think the guy I got it from meant “new” as in “new to this machine, ie, second hand”.  All LEDS light up when powered on.  I’ve opened this up and had a look inside and it looks ok though does have a sticker that says “Sept 99”:

(pic removed as I've posted too many).


Close up of the meters in/out:

(pic removed as I've posted too many).


Main board in situ:

(pic removed as I've posted too many).


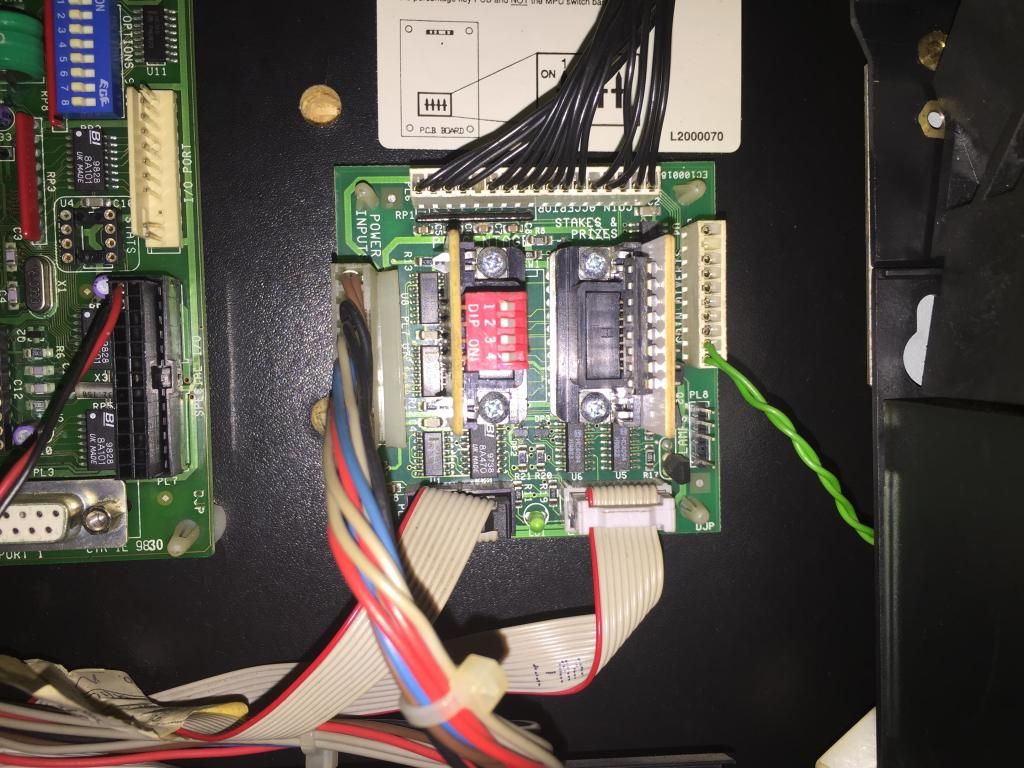
Stakes and Prize PCB in situ.  There is a sticker that mentions a 9-pin percentage key, but this PCB has a red plug with 4 dip switches and a black plug with 8 dip switches.  The red one is set to all off.  The black one is set to 1, 4 & 5 on and 2, 3, 6, 7, & 8 to off.  I can’t seem to find any “key” thing for this PCB but the sticker does show the various percentages linked to the four dipswitches on the red plug but there is no percentage for all switches being set to off, so why are they all to off?  Or is to turn the red one off and allow percentages to be run through the black one?:

IMG_2494.jpg


Lamps PCB in situ:

(pic removed as I've posted too many).


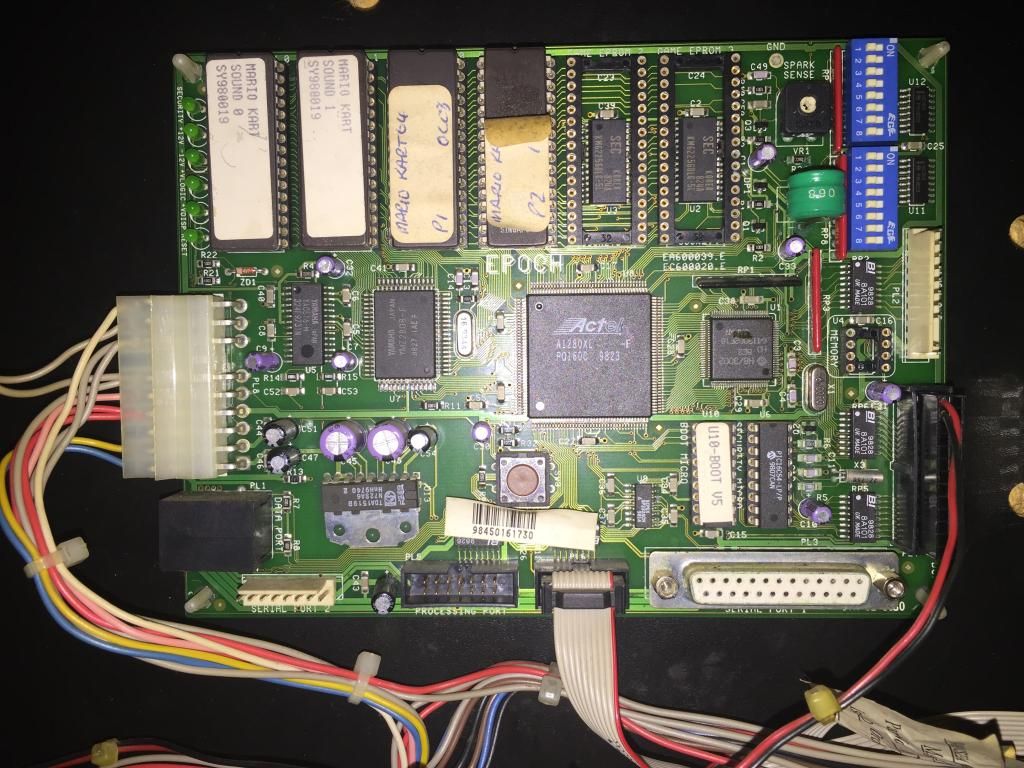
Onto the juicy part – the main board removed!!!  Was checking for any signs of battery leakage and nothing was obvious.  Here’s one side of the battery, looking nice and shiny:

IMG_2523.jpg


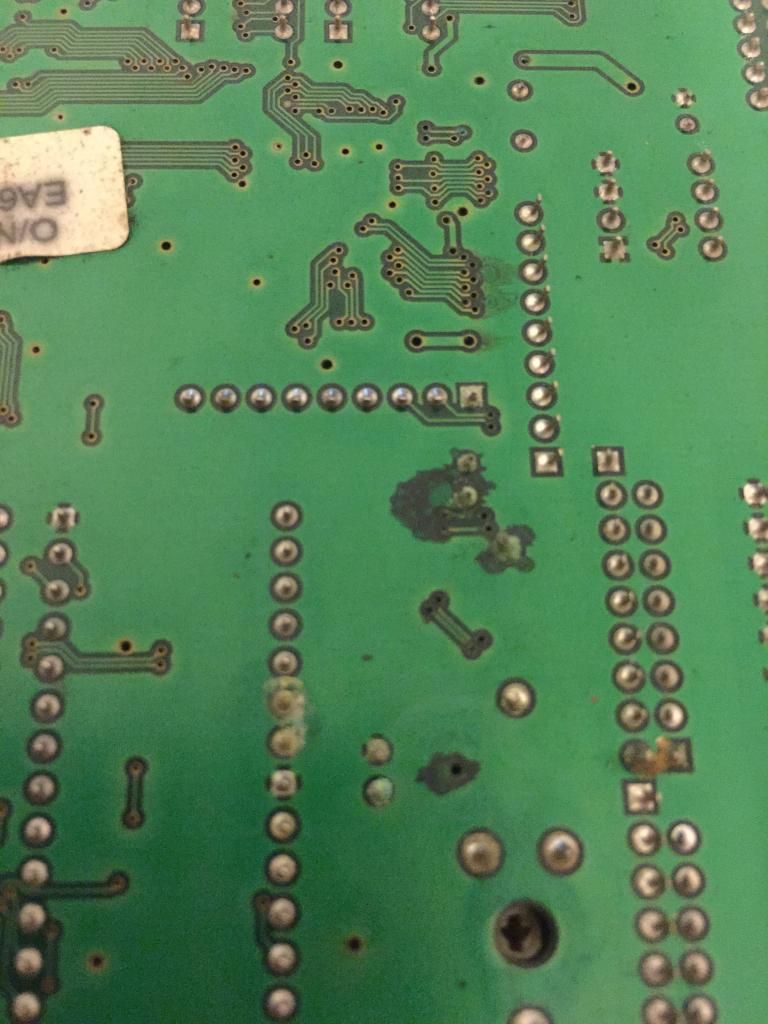
Though the other side of the PCB seems to tell a different story:

IMG_2527.jpg


So this is the green fuzziness linked to battery leakage?  Not as shiny as the other side of the battery:

IMG_2522.jpg


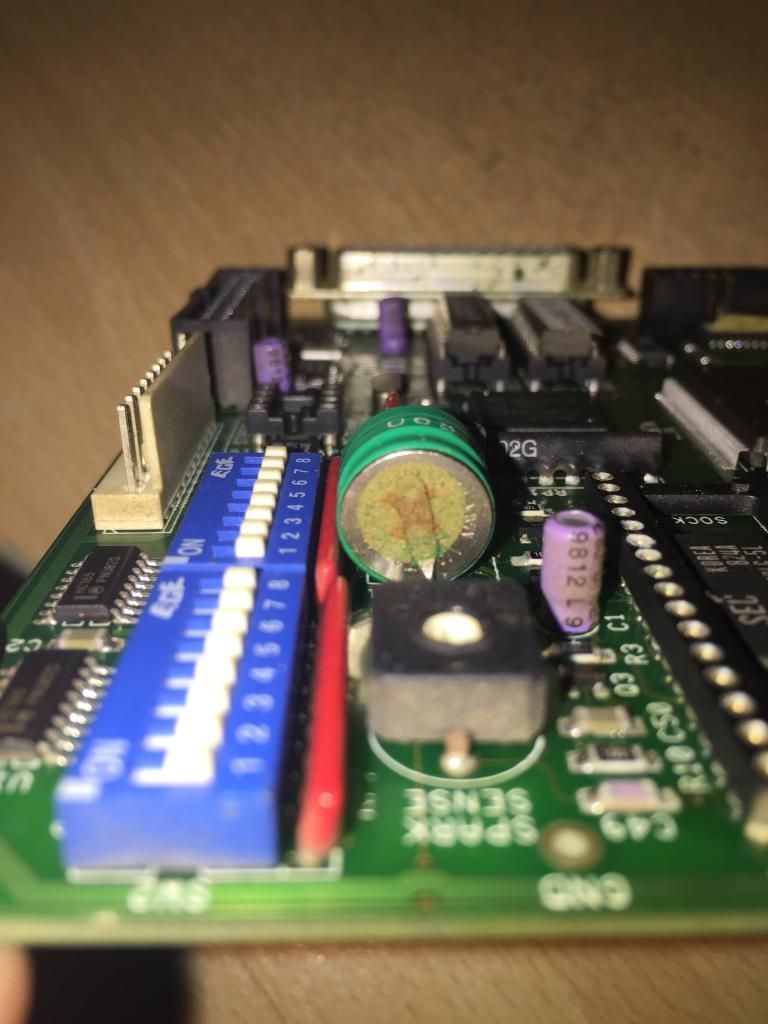
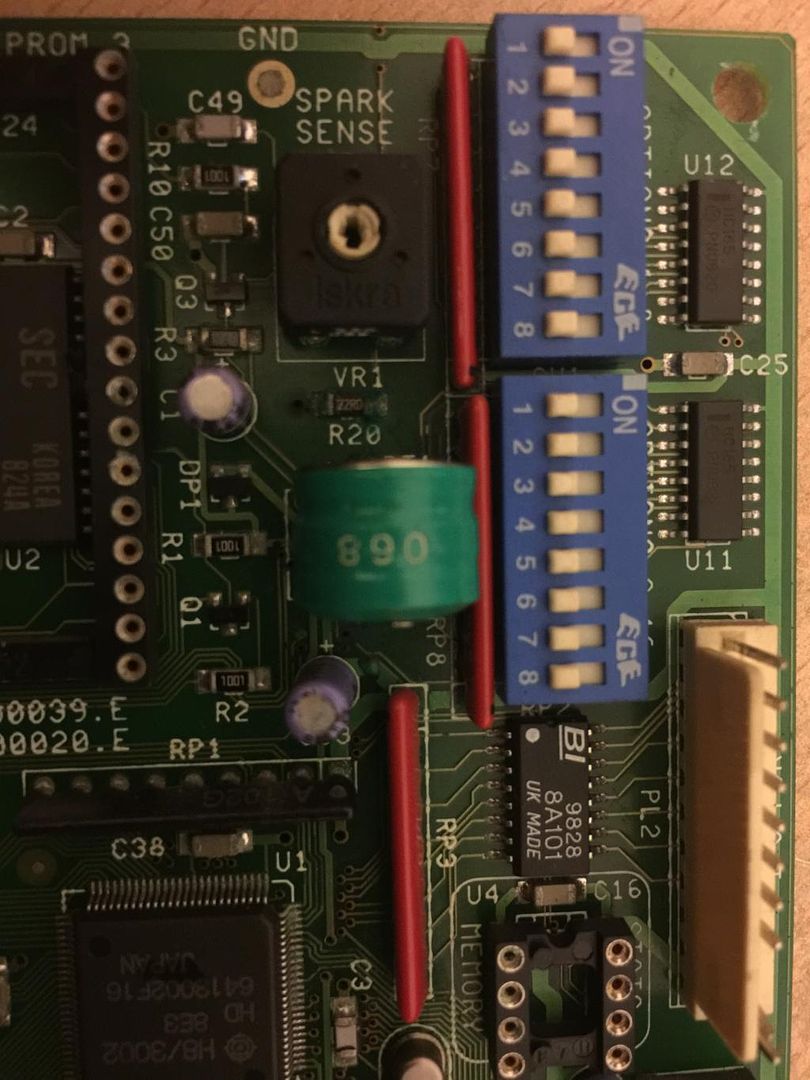
Looked like a bit of fuzziness on R20, so tried to get a pic:

IMG_2531.jpg


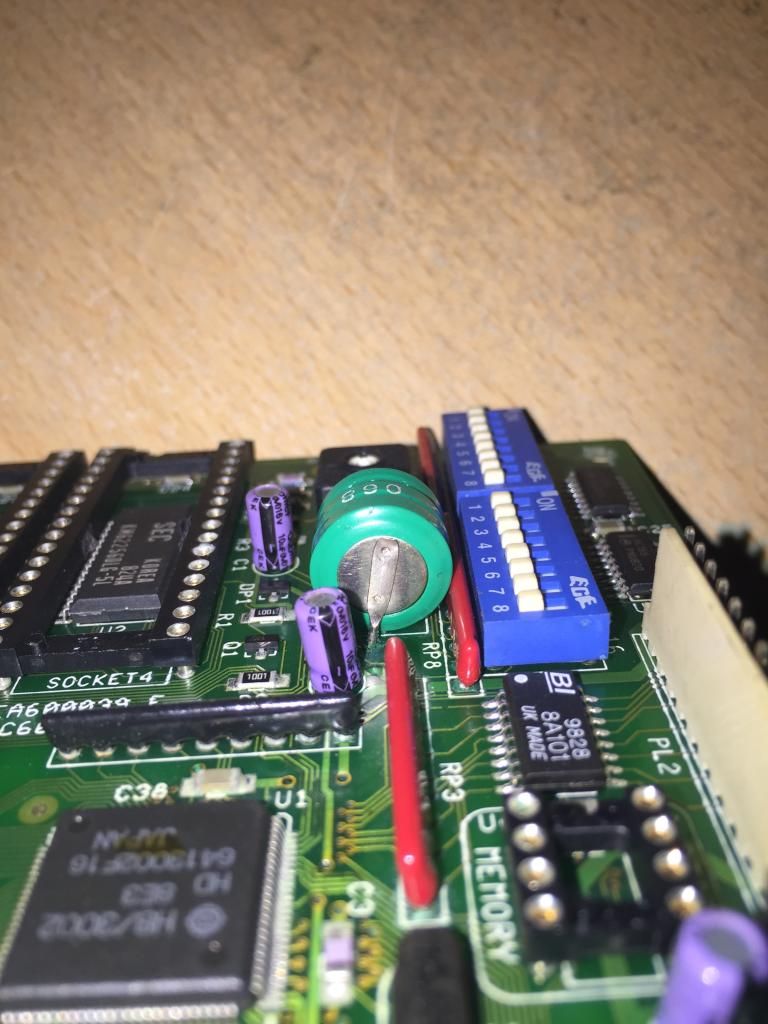
And from a different angle, note that the flash was off for this pic…also, what do these dip switches do and why are they all to off?:

IMG_2536.jpg


But then took another pic with the flash on and check it out…shows up the battery leakage corrosion really well.  Good starter for 10!:

IMG_2537.jpg


So, based on the above, I’m going to buy a main board to replace my clearly battery leakaged one and hope that will sort it out and get it going.  When powered up I’m getting nothing at all apart from all of the LEDs coming on on the PSU and the +12V and -12V on the main board.  No lights anywhere else or any movement.


On a slightly different note, when the PSU is powered up it seems to make a bit more noise than I would have expected, though that’s probably because it’s pretty old and there weren’t any other noises at all to mask the PSU noise.


Got a main board sourced and about to pull the trigger for it unless there are any members here with any for sale?  Would rather work with other forum users than buy from retailers looking for bigger profits.


Another thing, the cabinet door lock didn’t seem to work with any of the provided keys but luckily was in the open position, so got that lock switched with the one for the top cover part as the bottom door kept opening up on its own.


There’s a lock for a flat key on the section just above the cabinet door, but under the buttons, I guess this is the “refill key” lock?  I never got a refill key so will need to re-wire this into a separate switch – but what is the function of this lock?


Thanks for any help you offer.


Cammy


#2 Camster

Camster

    Newbie

  • New Members
  • 8 posts

Posted 21 February 2015 - 01:25 AM

Here are the pics I had to leave out, in case anyone is interested!


Close up of the PSU – clearly not a “new” one so I think the guy I got it from meant “new” as in “new to this machine, ie, second hand”.  All LEDS light up when powered on.  I’ve opened this up and had a look and it looks ok inside and has a sticker that says “Sept 99”:

IMG_2486.jpg


Close up of the meters in/out:

IMG_2487.jpg


Main board in situ:

IMG_2493.jpg


Lamps PCB in situ:

IMG_2495.jpg


Another question, bearing in mind I have no fruit machine experience.  Why when this sign states £5 prize (in one game?)…:

IMG_2517.jpg


Does this clearly replaceable section show £10:

IMG_2538.jpg


While another replaceable section shows £15:

IMG_2510.jpg


Does that mean the "Super Jackpot" would only be £5 or is there a way to play 3 separate games but build up to the £15 prize?


Thanks again,

Cammy.


#3 aaamusements

aaamusements

    Admin

  • Administrators
  • PipPipPipPipPip
  • 3508 posts

Posted 21 February 2015 - 01:35 AM

Hello and welcome to the forum. You have most of the usual maygay epoch issues!

1. Battery leakage on main board
2. Signs of overheating on lamp board connector, unreliable mark one lamp board
3. Noisy (buzzing?) PSU. This indicates that it has a mark one PCB in that too. The upgraded ones were much quieter!

#4 Camster

Camster

    Newbie

  • New Members
  • 8 posts

Posted 21 February 2015 - 02:53 AM

Hi,


Thanks for the reply.  Good spot with the overheating on the lamp board, just pulled the plug and the 4th wire down (black) has quite a bad burn mark inside the plug.  The 3rd wire down (also black) has some lesser burning.  Would the burn marks suggest that the board needs replaced asap or is that something that would get progressively worse and would need replacing eventually?  Might look into picking up a lamp board as well, if only as a spare.


Also correct with the PSU PCB.  Checked some pictures of PSU PCBs and my one looks just like the mark one PCB, however my one only has one fuse near the front and not two like in the comparison picture??  If I was to buy a mark two PCB would that just be a straight swap for my mark one PCB or is it a case of mark one PCBs only fit in mark one PSUs and likewise with mark two?


Cheers,

Cammy.


#5 Mavroz

Mavroz

    odd job man...

  • Layout Creator
  • PipPipPip
  • 882 posts

Posted 21 February 2015 - 03:19 AM

All mk2 pcb's are a straight swap.
 
Start with the main mpu, change this first and see what the results are.
 
Then the lamp board etc etc etc until you have a working machine. 
 
Note, boards are not cheap these days, especially if you can find them. Mpu's should be guaranteed working by a seller along with the mk2 psu card and lamp board, these are very difficult to source.


If the machines is on £15 jackpot then no-one has change the black £5 decal on the top of the machine.
 
Super Jackpot is usually the jackpot (£15) with a repeat chance.

#6 No1Stoney

No1Stoney

    Senior Member

  • Layout Creator
  • PipPipPip
  • 815 posts

Posted 21 February 2015 - 11:59 AM

Main board for sale: http://www.swallowam...uk/-awp.htm#pcb under "maygay" .£46.50 but from there it will be guaranteed working. Thats about the going rate these days. Also they have all the other items that you may need too. 


Hope you get it working, it certainly is worth getting it going again if its one you intend to keep, and also because of the mileage you have already done :-)


#7 Camster

Camster

    Newbie

  • New Members
  • 8 posts

Posted 22 February 2015 - 02:07 AM

Thanks for the info guys.


I found another thread with a link to Swallow Amusement so checked them out.  Not sure how accurate their stock numbers are but I decided to go for the main board, lamp board and mark 2 PSU board.  Definitely need the main board and keen to get the mk2 PSU board if it is significantly quieter as I was surprised by the buzzing when I first powered it up.


Possibly don't need the lamps board but if my one is showing signs of burning on it now then maybe good as a spare.  Completely forgot that when I was cleaning out the inside of the cabinet I found a spare PCB lying around.  After I made the order I spotted the spare board and it happens to be a lamp board as well.  Not sure if it's a spare working one or maybe it's an old one that has been replaced by the one currently fitted.


On that note, what do the burn marks on the lamp board connector mean?  There doesn't seem to be any burn marks anywhere else in that area, just mainly on that black wire, 4th one down.  Is there a fix to stop this getting worse?  Was thinking of hooking up a PC fan to a 12V line and have it blowing right onto the connector - thoughts?


Definitely planning to keep the machine so need to get it working.  I knew how far away it was and that it wasn't working but made the trip anyway seeing as I might not have had a chance to buy another Mario Kart machine again.


Can't wait for the boards to arrive, hopefully it'll be working again once they're fitted.  I'll definitely sort out relocating the battery on the new board!


Cheers again,

Cammy.


#8 Camster

Camster

    Newbie

  • New Members
  • 8 posts

Posted 22 February 2015 - 02:12 AM

Another question:


Any tips on removing the rom chips from the old board?  Read a few where people had snapped a few legs off them.  I've done some soldering on boards before, to fit sockets, and swapped chips around but those were newer, sturdier ones.  Really don't want to break one of these seeing as it'll be 15+ years old!!  Does anyone on here do a service of copying the roms as that would probably be a good idea!


Cammy.


#9 TommyC

TommyC

    Layout Designer

  • Layout Creator
  • PipPipPipPipPip
  • 2832 posts

Posted 22 February 2015 - 05:01 AM

Hi you can.buy a tool to remove the roms, I think its called an eprom puller? You can aslo remove with a small screwdriver gently pryingone end then the other. This Iis only advised if you know what your doing as done to rough you can bend and snap the legs on the eprom.
Hold the bells mate.

#10 No1Stoney

No1Stoney

    Senior Member

  • Layout Creator
  • PipPipPip
  • 815 posts

Posted 22 February 2015 - 07:58 AM

You shouldn't have too much to worry about removing the roms as long as you take your time and do it gently. I gently use a flat head screwdriver to raise one end up. Then the same with the other side bit by bit, and keep doing that until it's out. Trying to keep the eprom as flat as you can should avoid you bending the pins. And even if you do slightly bend any of them they can be (very carefuly) straightened again. Good luck.

#11 Mavroz

Mavroz

    odd job man...

  • Layout Creator
  • PipPipPip
  • 882 posts

Posted 22 February 2015 - 08:45 AM

Don't forget to remove the sec and boot chips from your old board and transfer them to the new one either.


Make sure all chips are placed in new board the RIGHT WAY around.... Basic error but i have seen it happen so often it is unreal.


#12 nick_uk_911

nick_uk_911

    The Flaming Moron

  • Regulars
  • 222 posts

Posted 22 February 2015 - 08:52 AM

I'm not very hot on the technical side of fruit machines but just wanted to say COOL MACHINE! Its pretty sought after ive seen them go on ebay for well over the £100 mark & its certainly a machine i wouldn't mind owning, but what puts me off is the epoch boards which as everyone here knows are very unreliable and not cheap/hard to source parts if something goes tits up 


#13 aaamusements

aaamusements

    Admin

  • Administrators
  • PipPipPipPipPip
  • 3508 posts

Posted 22 February 2015 - 04:01 PM

Don't forget to remove the sec and boot chips from your old board and transfer them to the new one either.
 
Make sure all chips are placed in new board the RIGHT WAY around.... Basic error but i have seen it happen so often it is unreal.


Although I've never changed a SEC chip and it hasn't seemed to make a difference. The boot PIC chip is essential though.

I remember putting a chip in the wrong way round once and the machine made a very strange noise, like it was in pain!

#14 Camster

Camster

    Newbie

  • New Members
  • 8 posts

Posted 22 February 2015 - 07:01 PM

Thanks again for all the info.  Like I said before I've worked on some sockets/chips before but they were always fairly new with plenty spares if something went wrong.  As someone else had said they had removed their one and a leg or two had broken off got me a bit worried as I don't have any spares of these one!


Happy to say I've removed the 4 game chips, boot chip and security chip with no issues, so they're ready to go on the new board.


Noticed there was an empty socket though - named "stats memory".  Is this usually empty?


Looked over the spare Lamps Board that came free with the machine - rattling around inside!! It has some pretty bad burning on two of the transistors (???) which has also melted part of one of the nearby plugs, so needless to say that must have been the original which has been replaced.  Going to give the currently fitted one a good look over as well but good to know I have a spare ordered.


Does anyone know the reason for this board to burn up?


Nick: I had never seen any Mario related machines before but now I have this one I don't plan to sell it and if anything would love to give it a decent restoration and get it looking good as new.  Even then though, got a feeling I wouldn't even break even selling it in perfect condition given the total price already paid out (purchase price + fuel to collect + parts on order) and that's not even including any restoration work.


Plan of action:

Fit new main board and mk2 PSU board and fire up the machine!

Any major issues with lamps and I'll change the lamps board.

If working at that point then I'll need to remove the battery from the new board.


Another question - what do all of the dip switches on the main board do?  They were all set to off.


Need to work out the two dip switch plugs on the prize/stakes board too!


Cheers all,

Cammy.


#15 aaamusements

aaamusements

    Admin

  • Administrators
  • PipPipPipPipPip
  • 3508 posts

Posted 22 February 2015 - 07:35 PM

Poor design made the original lamp boards overheat.

I seem to remember incidences of them catching fire, very rare though.

#16 Mavroz

Mavroz

    odd job man...

  • Layout Creator
  • PipPipPip
  • 882 posts

Posted 23 February 2015 - 08:43 AM

8 pin stats socket should be empty.

Keep dip switches the same as old board. You can inhibit attract mode, tell mpu there is a note acceptor connected etc with dips but settings between machines could be different.

If you have all leds lit on psu I would say the psu is fine for now. Replace as and when. Try mpu first...

#17 Mavroz

Mavroz

    odd job man...

  • Layout Creator
  • PipPipPip
  • 882 posts

Posted 23 February 2015 - 08:47 AM

Alex, I am sure I wrote a post a while back about boot and sec chips.....

The boot chips (think i have this right way) were initially meant to be programmable by the manufacturer. ... eg extreme / global etc would have their own boot chips for added security if needed... possibly like mpu4 chr chips on bwb.

I don't think they were ever put into operation or very few were...

V1.0 would be extre, v1.1 mayday etc etc.


3 user(s) are reading this topic

0 members, 3 guests, 0 anonymous users