amazing work konrad

Arduino as pac-drive alternative?
Started by majoris, Mar 27 2018 09:11 PM
Arduino pac-drive mamehooker
185 replies to this topic
#41

Posted 08 September 2018 - 11:21 AM
#42

Posted 25 September 2018 - 08:01 PM
OK. I think that simple version for Arduino Uno is ready to publish.
Usage is very simple.
1. Run MFME 6.1
2. Start some game
3. Plug in Arduino to PC
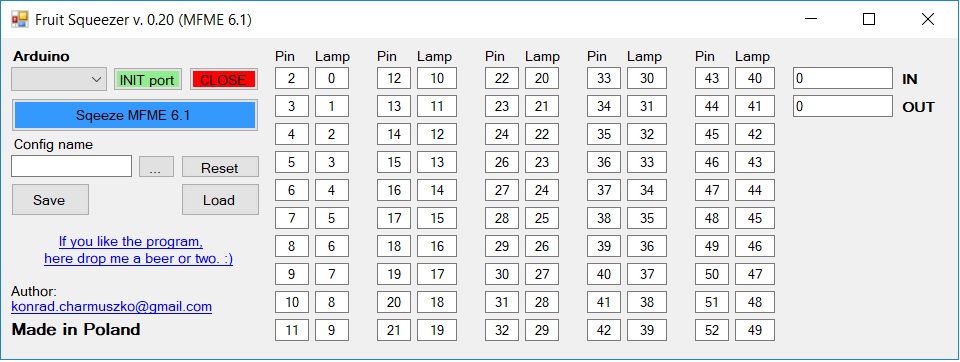
4. Run Fruit Squeezer
5. Press Squeeze button
6. Choose COM port with Arduino connected
7. Press INIT button
All the boxes are editable. Ardu Pin collumn means Arduino Pin - can be changed.
Lamp collumn contains lamp number. Can be read from design mode if you need to put there some specific lamp.
After you type in your config fields, it shoud be saved, because after exiting the Fruit Squeezer all the changes will be lost.
Put a game name in a filemane field and press save. It will create a config file in a folder where Fruit Squeezer is placed.
The same method is for config loading. Nothing more to explain. Choose a file, press load and here it is.
Arduino code to upload:
void setup(){
Serial.begin(115200);
pinMode(1, OUTPUT);
pinMode(2, OUTPUT);
pinMode(3, OUTPUT);
pinMode(4, OUTPUT);
pinMode(5, OUTPUT);
pinMode(6, OUTPUT);
pinMode(7, OUTPUT);
pinMode(8, OUTPUT);
pinMode(9, OUTPUT);
pinMode(10, OUTPUT);
pinMode(11, OUTPUT);
pinMode(12, OUTPUT);
pinMode(13, OUTPUT);
pinMode(14, OUTPUT);
pinMode(15, OUTPUT);
pinMode(16, OUTPUT);
pinMode(17, OUTPUT);
pinMode(18, OUTPUT);
pinMode(19, OUTPUT);
pinMode(20, OUTPUT);
pinMode(21, OUTPUT);
pinMode(22, OUTPUT);
pinMode(23, OUTPUT);
pinMode(24, OUTPUT);
pinMode(25, OUTPUT);
pinMode(26, OUTPUT);
}
void loop() {
while (Serial.available() > 0) {
int pin = Serial.parseInt();
int value = Serial.parseInt();
if (Serial.read() == 'x') {
digitalWrite(pin, value);
//Serial.println();
}
}
}
Enjoy and take care ![]()
ps.
Soon I plan to add hopper payouts.
Attached Files
- richy1976 likes this
#43

Posted 26 September 2018 - 10:04 AM
Hi Konrad,
Many Thanks
I try-it
Eric
#44

Posted 26 September 2018 - 02:23 PM
Soon I will finish version with 50 outputs.
I will publish this one with short instruction of usage. 50 output version is going to be the one which I'm going to develop further.
I is going to be missing hopper support, but it is going to be added.
As for steppers... we'll see. I haven't decided yet what I'm going to do with that feature.
#45

Posted 26 September 2018 - 07:53 PM
I think that my program is so simple that it does not need manual ![]() , so I publishi it as it is.
, so I publishi it as it is.
OK. Here is a version for 50 outputs.
For now only lamps can be assigned. Arduino Uno will not handle this scope without extenders. Arduino MEGA will.
So, for Aurduino, you should upload this code:
void setup(){
   Serial.begin(115200);
   pinMode(1, OUTPUT);
   pinMode(2, OUTPUT);
   pinMode(3, OUTPUT);
   pinMode(4, OUTPUT);
   pinMode(5, OUTPUT);
   pinMode(6, OUTPUT);
   pinMode(7, OUTPUT);
   pinMode(8, OUTPUT);
   pinMode(9, OUTPUT);
   pinMode(10, OUTPUT);
   pinMode(11, OUTPUT);
   pinMode(12, OUTPUT);
   pinMode(13, OUTPUT);
   pinMode(14, OUTPUT);
   pinMode(15, OUTPUT);
   pinMode(16, OUTPUT);
   pinMode(17, OUTPUT);
   pinMode(18, OUTPUT);
   pinMode(19, OUTPUT);
   pinMode(20, OUTPUT);
   pinMode(21, OUTPUT);
   pinMode(22, OUTPUT);
   pinMode(23, OUTPUT);
   pinMode(24, OUTPUT);
   pinMode(25, OUTPUT);
   pinMode(26, OUTPUT);
   pinMode(27, OUTPUT);
   pinMode(28, OUTPUT);
   pinMode(29, OUTPUT);
   pinMode(30, OUTPUT);
   pinMode(31, OUTPUT);
   pinMode(32, OUTPUT);
   pinMode(33, OUTPUT);
   pinMode(34, OUTPUT);
   pinMode(35, OUTPUT);
   pinMode(36, OUTPUT);
   pinMode(37, OUTPUT);
   pinMode(38, OUTPUT);
   pinMode(39, OUTPUT);
   pinMode(40, OUTPUT);
   pinMode(41, OUTPUT);
   pinMode(42, OUTPUT);
   pinMode(43, OUTPUT);
   pinMode(44, OUTPUT);
   pinMode(45, OUTPUT);
   pinMode(46, OUTPUT);
   pinMode(47, OUTPUT);
   pinMode(48, OUTPUT);
   pinMode(49, OUTPUT);
   pinMode(50, OUTPUT);
   pinMode(51, OUTPUT);
   pinMode(52, OUTPUT);
   pinMode(53, OUTPUT);
   pinMode(54, OUTPUT);
   pinMode(55, OUTPUT);
}

 void loop() {

while (Serial.available() > 0) {
  int pin = Serial.parseInt();
  int value = Serial.parseInt();
  if (Serial.read() == 'x') {
      digitalWrite(pin, value);
      //Serial.println();
    }
  }
}
And for MFME you run Fruit Squeezer - attached to this post.
In case of problems with the software, please report me. I'll try to correct errors.
Attached Files
#46

Posted 28 September 2018 - 03:42 PM
Hi konrad,
when i launch fruit squeezer many dll files are missing. i have download the missing dll files but another error messages appear. i have try it on 3 pc with w7 and w8 and the same error for all.
can you help me .
Eric
#47

Posted 28 September 2018 - 04:58 PM
Probably ms redist or netframe.
#48

Posted 28 September 2018 - 06:05 PM
Try to install NET Framework. This program is written in NET.
Did 'small' Squeezer worked? Large one is not much different, so I'm a bit surprized. Shoud work same as small one.
I'll try on other PC today. After a weekend I will have acess to ~20 other PC's ![]() so I will also try (few of them).
so I will also try (few of them).
#49

Posted 30 September 2018 - 04:28 PM
Here I upload 32 byte compilation of Fruit Squeezer.
As Richy said, NET Framework and Microsoft Visual C++ Redistributable should be installed in the System. There should be no problems after that.
Preview screenshot of the software:

Attached Files
Edited by majoris, 30 September 2018 - 04:37 PM.
#50

Posted 03 October 2018 - 03:01 PM
Hi Konrad,
All is Ok For me
Many Thanks.
Eric
#51

Posted 03 October 2018 - 03:06 PM
Bonjour Konrad,
Penses tu qu'il sera possible plus tard d'ouvrir une rom mfme et lancer automatiquement fruit queezer qui correspond a la rom ?
Eric
#52

Posted 03 October 2018 - 08:21 PM
You mean that you don't have to press SQUEEZE button? I'm working on it. Automatic refresh of Squeezer is absolutely essential to use this software for cabinets. I plan to build my cabinet, based on Arduino in 100%, so I'm also going to need this feature. Two main goals for now. Hopper support and automatic refresh, after ROM change.
#53

Posted 04 October 2018 - 05:40 PM
Updated version of Fruit Squeezer 0.22.
Changes:
1. Automatic update after ROM change.
No more need of pressing the blue button after every new game loaded - automatic update. Squeeze button is pressed only once, after loading of first game ROM, after this action we can forget on Fruit Squeezer. It runs in a background fully automatic.
Now only hopper support is going to be added, and first big part of the program will be finished. It will be 100% able to handle cabinet. Buttons can be implemented by using cheap USB keyboard encoder.
Take care
Attached Files
#54

Posted 04 October 2018 - 06:13 PM
hi konrad
amazing
#55

Posted 08 October 2018 - 11:49 AM
Hopper implementation is harder than I thought. It will take some time to figure out. Arduino code is changed and ready to run hopper, but the main problem is getting propper hopper signals from MFME. It is almost coded but I must avoid misshots when another ROM game is loaded - in present shape it would spit a coin every time the game is changed. Cool hack isn't it ![]() ?
?
Hoppers for testing are ordered, and should arrive soon. If it will run succesfully, I'll share this solution of course with you all. I can't wait for it, because it will end my work on Fruit Squeezer software and allow me to start building my cabinet.
#56

Posted 08 October 2018 - 04:57 PM
Bonjour Konrad,
Sera t-il possible de contrôler la trémie directement par arduino avec un ssr relay pour le signal du moteur comme avec le pacdrive ?
et un encodeur de clavier pour le signal de sortie des pièces ?
Eric
#57

Posted 08 October 2018 - 05:54 PM
Hi Konrad,
Will it be possible to control the hopper directly by arduino with a ssr relay for the motor signal as with the pacdrive ?
and a keyboard encoder for the money output signal ?
Eric
#58

Posted 08 October 2018 - 08:50 PM
Right now Arduino is programmed like that:
it listens to a signals from MFME - payoyt signals are marked differently (by me) from LED signals, so Arduino knows when to count it.
When Arduino gets the hopper signal from MFME, it counts it as a pulses, incrementing the internal counter.
If this counter is bigger than 0, it fires a pin responsible for motor (goes HIGH) - yes you can use here SSR or any 5V relay to drive larger motor.
And now a difference as I see, from the Pac Drive. No coin signals are used from the keyboard encoder. I use another arduino pin to connect coin sensor (transoptor).
Each pulse on a coin sensor pin (transoptor), will decrease Arduino's internal hopper counter by 1. 1 coin -> 1 signal -> 1 decremantation of a counter.
After counter reaches 0 again, motor pin goes LOW, motor stops and all system is waiting for your next payout.
Simple. But it 'costs' 2 Arduino pins for running this feature.
Take care
Konrad
ps.
I'm thinking on implementation of Squeezer to MAME & Virtual Pinball. Will try MAME for sure, because it seems to be more easy to use from Mame Hooker.
Edited by majoris, 08 October 2018 - 08:53 PM.
#59

Posted 09 October 2018 - 04:45 AM
Hi Konrad,
i have a pincab,
it'a future great project
Eric
#60

Posted 13 October 2018 - 09:09 PM
Hopper support is almost done. I will not release the untested software, but this is a matter of short time. Hopper motor control and sensor is tested on external electronic parts. Now it is time to test it on a real hopper - the one I purchased few days ago - Cube Hopper MKII. After I confirm hopper support as working, my software will be finished and fully functional for 100% Arduino based cabinet construction. All my stests seem to be very promising so I expect success.
Take care
Also tagged with one or more of these keywords: Arduino, pac-drive, mamehooker
Fruit Emu Emulation Section →
MFME emulation section →
Cabinet Building →
Stepper motor control signalStarted by majoris, 27 Mar 2018 |
|

|
1 user(s) are reading this topic
0 members, 1 guests, 0 anonymous users


